Showing posts with label vegetarian. Show all posts

Monday, December 19, 2011

Recipe Redux: Stuffed Bell Peppers with Quinoa & Lentils

I am absolutely excited to officially be a member of "Recipe Redux". What an honor and privilege to be part of a group of dedicated registered dietitians in creating healthy and delicious recipes. This is my first contribution to the group.

The theme for this month is legumes and beans created in a festive manner. Since I love the wonderful taste of lentils, I decided to create a recipe centered on lentils embedded on top of a quinoa base stuffed in a beautiful green pepper. For my recipe I used green peppers and green lentils sprinkled with red pimientos on top.  However, you can also switch up this recipe by using red peppers and red lentils and sprinkling it on top with green onions to create a festive look.

Ingredients:

1 cup uncooked lentils
1/2 cup chopped onions
2 cups water
2 tsp McKay's Beef-Style Powdered Broth
1 tsp mushroom seasoning


1 cup uncooked quinoa
4 cloves chopped garlic
2 cups water
2 tsp McKay's Chicken-Style Powdered Broth
1/3 cup diced tomatoes
2 tsp of lemon juice
Salt to taste (optional)


6 green bell peppers
1 tbsp of olive oil
very slight pinch of salt and pepper


Directions:


Preheat oven at 325 degrees F. Pre-grease a cookie sheet or pizza tray with canola oil. Set aside.


Start the lentils first, since it takes longer to cook. Fill a sauce-pan with water and place on medium heat. Add lentils and powdered McKay's Beef-Like broth and stir. When water is boiling, bring down heat a little and cook until lentils are very tender. This may take anywhere between 30 to 40 minutes or so. 
While lentils are cooking...
 ...you can start chopping up the onions and sautee them. Set aside. Check lentils in the mean time for tenderness. If water running low, add just the right amount of water to keep it cooking. When tenderness is achieved and a little water is still visible, add and stir the sauteed onions along with the mushroom seasoning. Stir well. Set aside when done.

Quinoa doesn't take as long to cook. In a different sauce pan, pour in 2 cups of water with 2 tsp of powdered McKay's Chicken-Like broth. Stir. Add in quinoa. Boil for about 15 minutes or so until you see the rings appear on the quinoa.
While quinoa is cooking...
...chop up garlic and sautee. Set aside. When little water is still visible and almost gone from quinoa, add and stir in the garlic and tomatoes. Add the lemon juice and stir the entire mixture. Set aside.
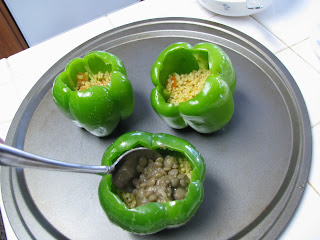
After washing the peppers, carefully cut off the tops of the green peppers. Clean out the inside of the peppers. Brush the outer skin of the green peppers with olive oil mixed with a very slight pinch of salt and pepper (I only have 3 green peppers pictured here, but the amount of lentils and quinoa will fill up six green peppers.)

Fill up half way the green peppers with the quinoa mixture. Pack it down well while filling up half way.
Fill up the rest of the green peppers with the lentil mixture. Pack it down well and pile it up.
Place pimientos on top of stuffed bell pepper.
Place and bake in oven for 18 to 20 minutes.

 After removing from the oven and allowing to cool a little, your stuffed green peppers will be ready to be transferred to your serving dish and is ready to be served.


These stuffed green pepper with lentils and quinoa comes packaged with vitamin C, fiber, protein, and folate. This entree presents a power-house of nutrients. Enjoy!

Sunday, December 4, 2011

My Experiment Making Crispy Rice Treats

Growing up in the wonderful U.S. of A., you can't help but be exposed to the goodness of Rice Krispies Treats. Oh, how I've loved this treat ever since I was a child. For fun, I decided to explore making a "healthy version" of this American classic. 

My first thoughts were, we have got to use brown rice for the crispy rice. I know! Attune Food's Erewhon Crispy Brown Rice should do a good job. Then my next thought was to hunt down a marshmallow that is not made out of animal product, since the regular marshmallows found in the supermarkets are animal based. Low and behold, Clark's Nutrition store came to the rescue and sells vegan marshmallows! Yay! The brand name is Dandies. It's on the pricey side, but delicious and definitely a healthier alternative. Then since Rice Krispie Treats includes butter in its original recipe, I decided to use margarine...just to cut corners on saturated fat. Oh yes...I did forget to include the margarine in the picture. Oh well...

I proceeded to use the original Rice Krispies Treat recipe 
and just merely substituted using the exact portion sizes for the cereal, marshmallows, and margarine. Believe me...I really got excited to do this!

 I started to throw in 3 tbsp of margarine and melting it in a large pot.
 I also immediately threw in 4 cups of the marshmallows.
 The good news is that Dandies marshmallows does melt, but it just doesn't melt as easily, nicely, or fluidly as regular marshmallows...but again, it melts!
Then 6 cups of the crispy brown rice were added to the melted marshmallow and margarine. I stirred it around and mixed it around as best as I possibly could.
 I transferred the mixture immediately to a pre-margarined casserole dish container. Using wax paper, I flattened out the mixture as best I could. 
 After I had flattened it all out, I laid it aside to cool.
 Voila! The finished product! A friend came over the night I made these. This particular friend also happens to be a Rice Krispies treats fan. Although it does not taste exactly the same as the original Rice Krispies treat as my friend noted (as I noted too), my friend stated how much he really liked it and kept eating it that night. That made me happy. If you ever make these, just know it doesn't take just like Rice Krispies Treats, but it does have its own similar nice taste. Also keep in mind, this version has fiber and no animal products. Sugar content though is somewhat lower, because Attune Foods is conscientious about making cereal without a ton of sugar like other cereal brands do. It definitely is a nice overall alternative for a healthier treat!
 

******
What other favorite American desserts did you grow up with?


Saturday, December 3, 2011

Kabocha Squash Soup Recipe by Maggie

My colleague and dear friend, Margarete Carneiro, graciously shared a delicious, but easy to make recipe with me to share on my blog. Maggie is a registered dietitian at Loma Linda University Medical Center where she is the outpatient transplant dietitian. Maggie is also a certified diabetes educator. Concurrently, Maggie began her studies this quarter for her doctor in public health degree. I wish my friend well as she continues on in this academic journey! 

When you hear the word kabocha, does that sound Japanese to you? Well, it sure does to me! Kabocha squash, a Japanese squash, is packed with a lot of beta carotene, which will be converted into vitamin A once you take it into your body.

I really enjoyed making Maggie's recipe and you will too. I meant to take a picture of the kabocha squash before I cut it, but I forgot! My apologies. However, just in case you're unfamiliar with how a kabocha squash looks, picture a small pumpkin, except that its color is dark green.

Ingredients:
- 1 whole kabocha squash
- 6 cloves chopped garlic
- 1 chopped onion
- salt and black pepper to taste
- canola oil


Directions:


Wash the skin of the squash really well, preferably using a scrub. If you can buy the squash already cut in half, it will make cutting the squash easier. At the store I bought this at, they only sold it in one whole piece. If you buy this squash at an oriental market, they usually offer cutting the squash for you before you go home. Once at home, cut the squash into sections. They do not have to be cut into small pieces.
 Remove all the seeds.
  Cook it in boiling water enough to cover
the squash for about 20 minutes or more. Test to see when it is soft using a fork.

 While the squash is boiling, chop your garlic and onions.
Then sautee the garlic and onions in canola oil.


Once the squash is cooked just remove that outer part on the middle that is kind of hard, and place everything else (including the skin) into your food processor or blender. Add water (the same used for cooking) for the desired consistency. Add the pureed squash back into the original pot that the squash was boiled in and turn on stove to medium heat. Add the sauteed garlic and onions. At this point, you can add more water if you desire a thinner consistency of soup. Add salt and pepper according to your preferred taste. You'll notice that you don't have to season the kabocha squash soup too much, because the kabocha squash if very flavorful in and of itself. It ends up being a low sodium soup, which is a nice plus.
This flavorful soup will warm your soul.
Enjoy!

Thank you, Maggie, for sharing a wonderful recipe!

******
What is your favorite soup this time of year?